
Regardless of size or scale, all businesses aim to maintain accurate records. And this is where QuickBooks accounting software comes to light. QuickBooks is a renowned software with numerous features, tools, and other technological advantages to assist users in accurately managing their businesses. Users need to understand how to reconcile in QuickBooks Online.
Reconciliation systematically compares the bank’s cash flow statement with the transactions listed in QuickBooks Online. You have to balance your savings and credit card accounts once a month. Conversely, after you have the bank statement, check that it matches the transactions in QuickBooks. Your funds are accurate and balanced if the financial balances between the two documents match. This article aims to understand QuickBooks Online reconciliation and its significance comprehensively.
What Is Reconciling In QuickBooks Online?
Comparing two statements—one associated with the user’s bank account and the other with QuickBooks Online—is the reconciliation process in QuickBooks Online. Users are directed to reconcile in QuickBooks with their data monthly to ensure the accuracy and precision of their final balance amounts and to facilitate easier error searching. The customer is responsible for ensuring the balances on the two records match. If there are any problems, users can modify the record. Reconciliation validates QuickBooks.
Why You Should Reconcile Your Bank Accounts in QuickBooks
Reconciling bank accounts in QuickBooks is essential because it helps users ensure that they have recorded everything they earned or spent in the previous month (income or expenses). Additionally, when users reconcile their accounts on time and balances are accurate, managing funds with QuickBooks becomes more accessible.
How Often Should You Reconcile in QuickBooks Online?
Reconciliation promptly becomes necessary to confirm the accuracy of your QuickBooks accounts. The best course of action is a monthly account reconciliation. Additionally, be cautious that this process takes little time, as it could result in inaccurate final balances of the records. Furthermore, the final objective of reconciling is to remove the disparity between the two forms. Reconciliation regularly helps identify your company’s exact value and weaknesses.
How to reconcile in QuickBooks Online
If you carry out the bookkeeping process independently, understanding the reconciliation process in QuickBooks software will make this process quicker and more accessible and help balance the figures. The users are instructed to follow the steps below and begin reconciling in QuickBooks.
Step 1: Search for Reconciling Window
- Tap on the Accounting tab and choose the Reconcile option.
- Select the gear tab, and choose Reconcile.
Summary and History By Accounts: these links will appear in the upper right corner of the reconciling page.
If you tap Summary, you will see a list of the preceding reconciliations (done earlier) and the respective dates mentioned alongside.
Meanwhile, if you tap the History by Accounts, the same list with specific alterations and modifications done by QuickBooks will appear on the screen.
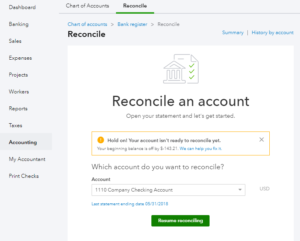
Step 2: Choose Any Account
“Which account do you want to reconcile?” is one of the messages frequently appearing to users on the Reconciliation page, along with a menu listing all the added accounts.
Select an account using the list on the screen, then click the Reconcile tab. Users must preserve their progress during the reconciliation process to continue it at a later time and prevent the data from collapsing.
Step 3: Provide Your Bank Statement Details
On the Reconciliation page, three fields will appear:
- Beginning balance amount
- Ending balance amount
- Ending date of the transaction
Look for the ending balance and the ending date on your statement provided by the bank in the records with QuickBooks. It is vital that both the final balance amounts match each other. If you have opted to go paper-free, you must be competent to open the bank statement from your online banking account.
Step 4: Match the transactions
Now, go through the transactions recorded with your bank statement and QuickBooks online simultaneously and compare them. If the final balances align with each other, checkmark that transaction as “Cleared,” and amounts marked as “clear” will be deducted from the difference appearing on the screen.
Users can apply filters to the recorded transactions to find the file easily by:
- Payments
- Deposits
- Cleared Status “C”
- Type Of Transactions
- Date
The users can type the details of the transactions, like reference numbers and amounts, in the “Find” tab.
Step 5: Continue removing Transactions Until the “Difference” gets Zero
Keep on examining the transactions recorded until every transaction is checked off properly. Right at this point, the difference appearing should be zero. If not, the users need to work out why it is so. Sometimes, transactions recorded with the statement cannot be entered into QuickBooks Online.
Then, the users are instructed to save their work and add the missed transactions before heading to the reconciliation process. Once you have resolved all the errors, you will be notified of a “success” message on your screen. Lastly, click on save and finish the process.

Step 6: Print
Once all the transactions are correctly checked, the difference is zero, and the users are also notified of a “success” message. Tap on the History by Accounts tab to print the document.
Step 7: Replicate the Same Process
After reconciling any account, remember to repeat the same process for other transactions. Many businesses have multiple sources of revenue to which they must conform. In such cases, the users are strictly instructed to seek advice from experts or professionals who will guide them in reconciling all income and expenses to avoid any consequences in the future.

Conclusion
After thoroughly examining this article, we speculate that QuickBooks users must have developed an advanced understanding of reconciliation and will be able to reconcile their accounts in QuickBooks easily. Still, users can connect with the QB experts if they encounter technical errors. Experts are available around the corner to assist the users. Meanwhile, the users can also get support by visiting their website via qb.support. With this, the users will be able to connect with QuickBooks support experts who can help them quickly reconcile in QuickBooks.


