How to Void a Check in QuickBooks?
QuickBooks users might often encounter numerous errors related to checks in their daily lives, such as inserting an inappropriate amount on the check or issuing it to a different individual while paying the bills. In such circumstances, the users can void the check using the QuickBooks Desktop before the completion of the transaction. Although the voided checks will be represented in the applications’ register, their value will be 0. This is because the registry maintains a proper record of all the voided transactions for the check’s payee, date, and number.
The users must remember that even after the check is voided, the transaction will be displayed in the books of account. There are different reasons to opt to void any check, which varies from organization to organization and person to person. However, if the users are willing to delete the check, the transaction will be permanently removed from the account books. And the paid status will get back to the unpaid one. Also, the users cannot locate the deleted entry from the records after the deletion.
Through this article, we intend to teach users how to void a check in QuickBooks desktop for payroll and bill payment checks.

 A window including all the checks created will appear on the screen. Double-tap on the check that you are willing to void, as displayed in the picture below.
 Once you click the void tab, you will observe that the amount will automatically turn 0. You will notice a” VOID” In the memo field. Lastly, tap on the save and close option to complete the process.
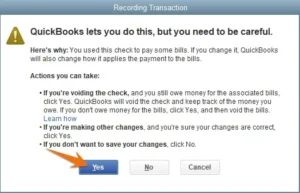
 After this, the users will be notified of a message stating, “Do you want QuickBooks to record the changes.” Tap on the yes tab to proceed.
Voiding a Check – An Overview
To void a cheque means that the check cannot be further used for any payment or for withdrawing money from the account. Whenever the user voids a check, the amount returns to 0, and the entry also gets recorded in the check register as “VOID.” The steps below allow users to easily void a check on the QuickBooks desktop. Note: Please note that the steps below only apply to QuickBooks desktops.Methods to Void a Bill Payment Check in QuickBooks Desktop
Below are specific methods that users must follow to void a bill payment. Check-in QuickBooks Desktop.Method 1: Go through the Check Register
- From the homepage of QuickBooks desktop.
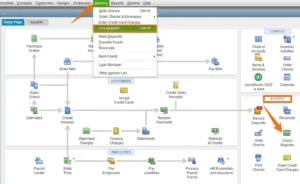
- Tap on the banking menu.
- Forge ahead by selecting the check register option. The users can also tap on the banking menu displayed at the top.
- Lastly, like the use register tab.
Method 2: Choose the Check to Void
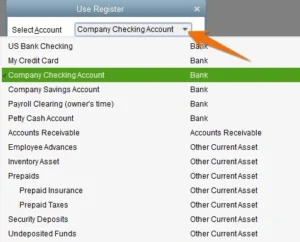
Select the bank account that has issued the cheque you want to void. For instance, we have selected the company checking account here.
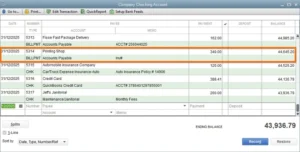
A window including all the checks created will appear on the screen. Double-tap on the check that you are willing to void, as displayed in the picture below.
Method 3: Void the Check
Once you select the check from the list, it will appear on the screen. You will observe that outstanding bills that you owe to the vendors are also included in the list. Lastly, tap on the void tab.
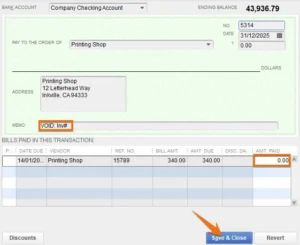
Once you click the void tab, you will observe that the amount will automatically turn 0. You will notice a” VOID” In the memo field. Lastly, tap on the save and close option to complete the process.
After this, the users will be notified of a message stating, “Do you want QuickBooks to record the changes.” Tap on the yes tab to proceed.
Steps to Void a Payroll Check in QuickBooks Desktop
From the users’ point of view, voiding a payroll check in QuickBooks desktop is more complex than voiding bill payment checks. Reissuing a payroll check can be quickly done by reprinting it with a new check number instead of voiding it. Below are steps that need to be followed to void the app payroll check on the QuickBooks desktop.Step 1: Go through the check register
- From the homepage of QuickBooks desktop.
- Tap on the banking menu.
- Forge ahead by selecting the check register option. The users can also tap on the banking menu displayed at the top.
- Lastly, like the use register tab.
Step 2. Search the Payroll Check
- Tap on the payroll check you are willing to void from the check register.
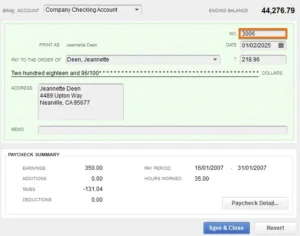
- To look for the paycheck, click on the input line twice. Make sure you note the current check number of the selected check. For instance, in the given image, the check number is 3006.
Step 3- Print again with a new check number
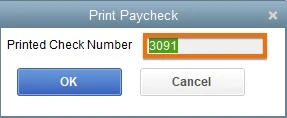
- To modify the check number, tap the print button on the top.
- Select the check option from the drop-down list, as shown in the picture.
- The QuickBooks desktop will automatically generate a new check number. The users are strictly instructed to ensure that the unique number complies with the check-in of your printer; otherwise, modify it again.
- After the new check number gets printed, it will be automatically recorded in the check register. Now, you can quickly locate the new check from the register.
When to Void a Check in QuickBooks Desktop
Listed below are certain circumstances where it becomes necessary for the users to void a check in QuickBooks desktop- In case the check gets stolen or lost somewhere.
- The check is mistakenly issued to any other individual.
- The information entered in the cheque is inappropriate, such as the wrong date or amount.
- There are duplicate checks available.


